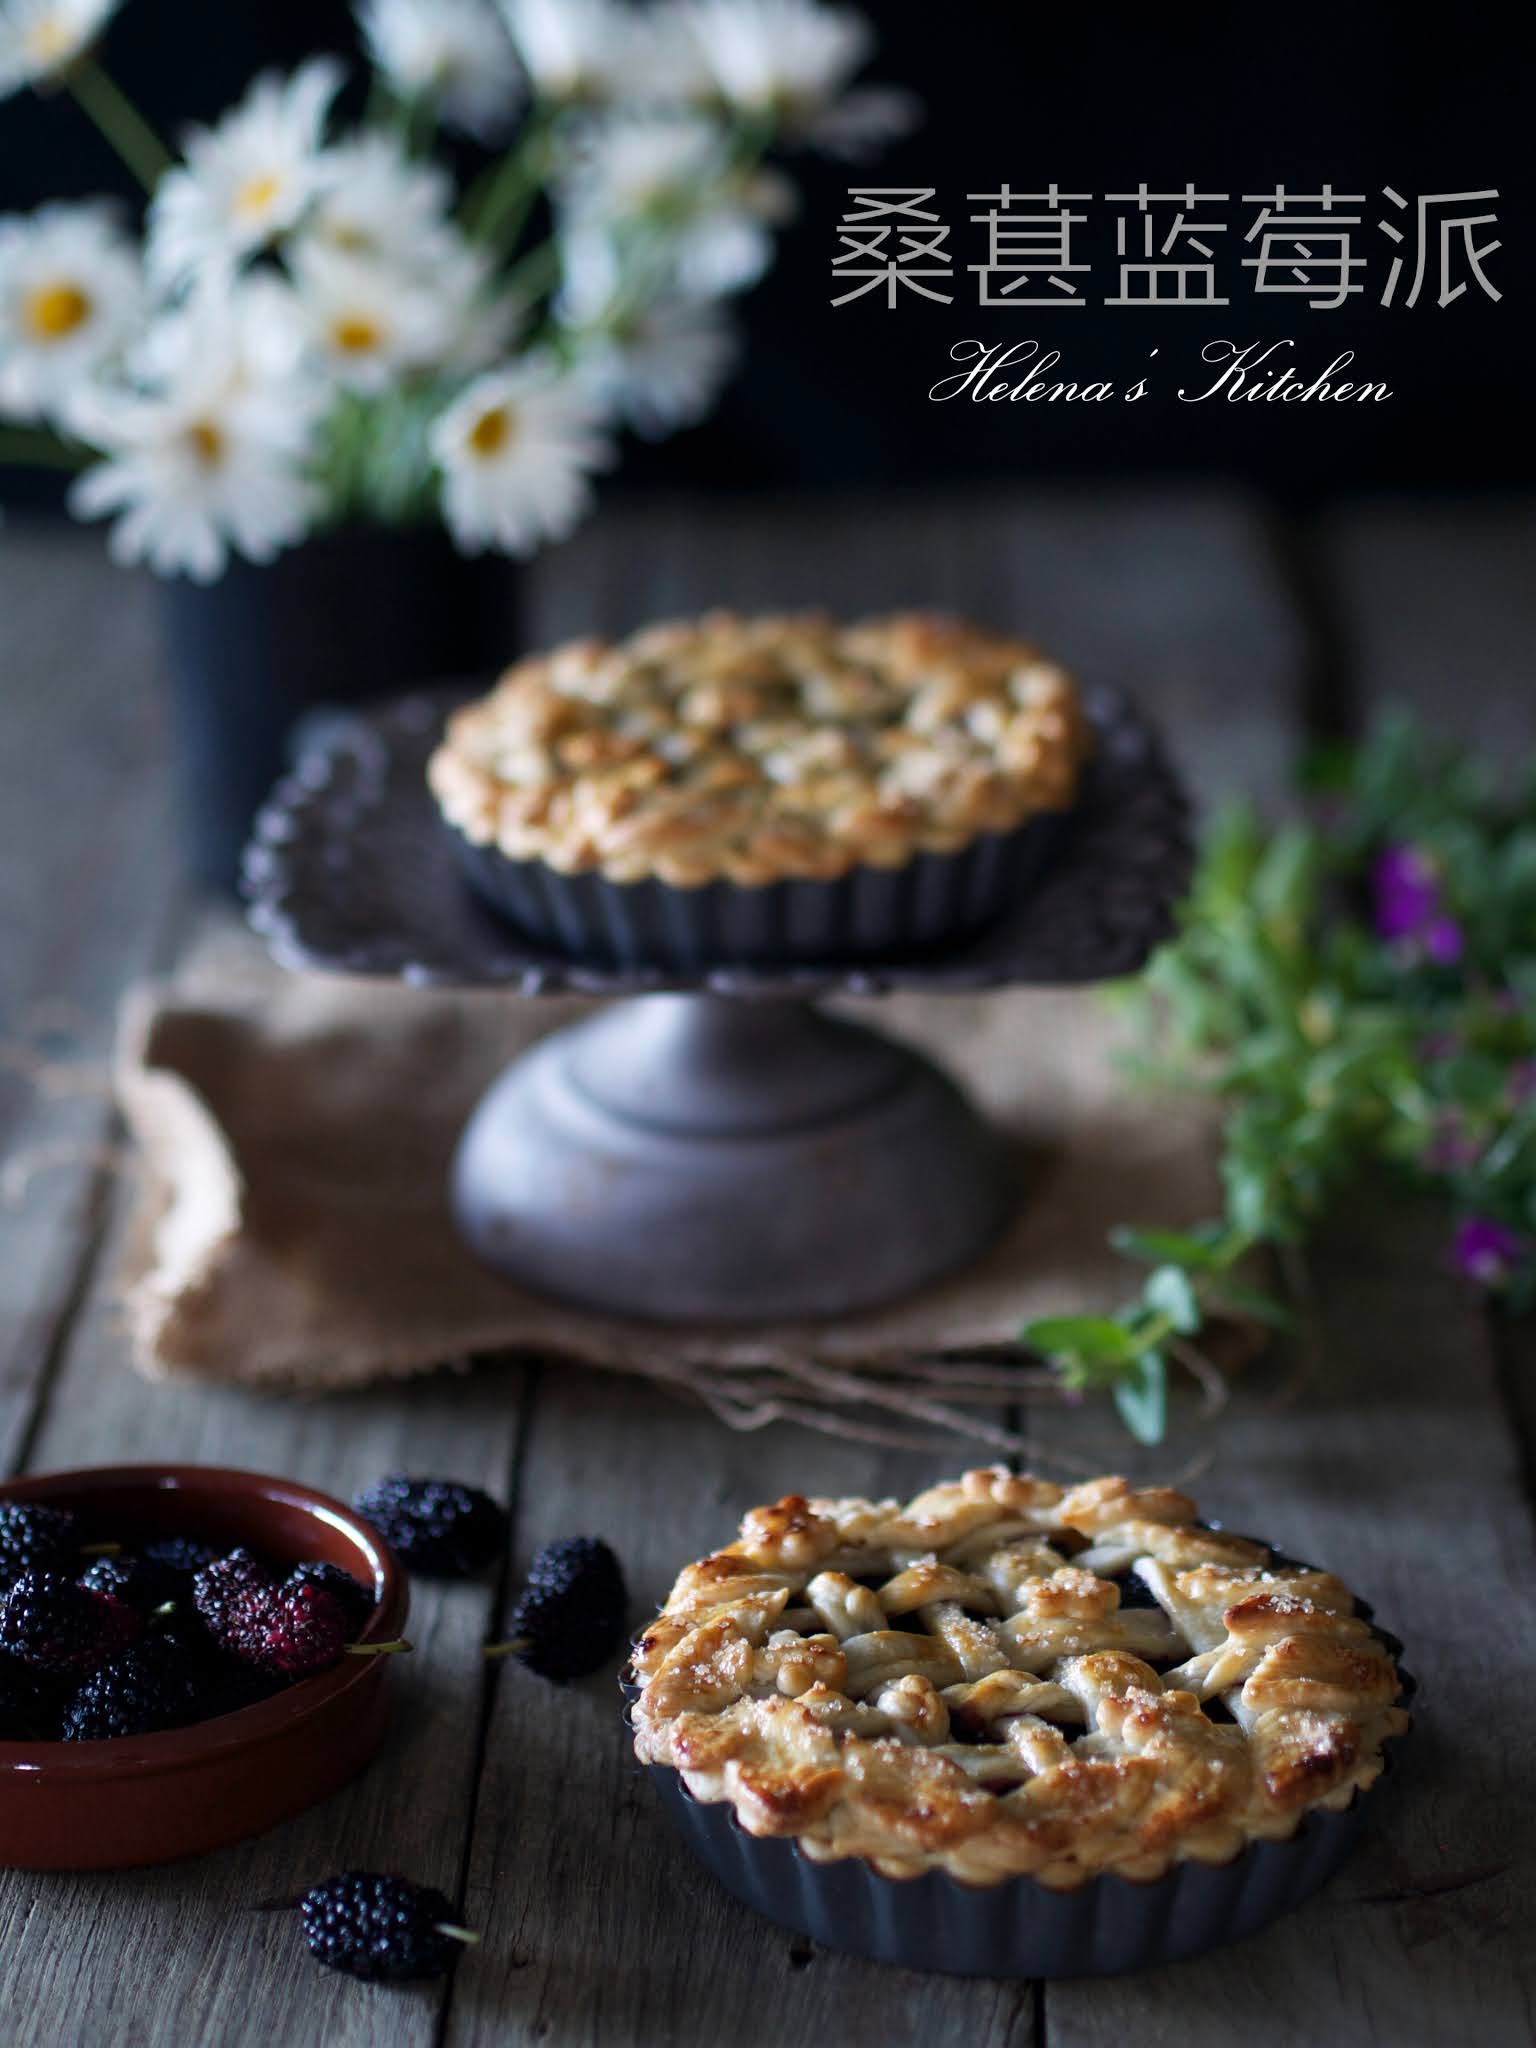
Pages

Showing posts with label Tarts & Pies (塔/派). Show all posts

Friday, 2 April 2021

抹茶塔和柠檬塔(Lemon & Matcha Tarts


派皮材料:(可以做10个)

140g 无盐奶油(室温软化)

70g 糖粉

40g 

40g 杏仁粉 

260g 低粉 

少许 

1 tsp 香精


做法

1)将奶油,糖粉,盐及香精用打蛋机混合拌均,加入蛋,拌打均匀。

2)把杏仁粉加入,混合均匀,最后拌入低粉,搅拌成顺滑的面团。

3)盖上保鲜纸,放入冰箱冷冻至少三小时以上。

4)把面团取出,杆成约5mm薄度,轻轻按入挞模里,把多余的面团除掉,用叉子在底部刺小洞。

5)将挞模放入冰箱冷藏10分钟,取出,放入预热烤炉,以170度烤约15分钟或呈淡淡的金黄色。


柠檬芝士蛋糕(做四个)

A

50g 奶油奶酪(室温)

10g 细砂糖

20g 原味酸奶(室温)

2g 柠檬汁

2.5g 吉利丁

30g 鲜奶油(thickened cream


B

覆盆子果酱


做法:

1.吉利丁用一大匙水预先泡软

2.奶油奶酪加砂糖搅拌至无颗粒,加入酸奶和柠檬汁一起搅拌均匀。

3.加入融化了的吉利丁继续拌匀

4.奶油打发6-7 分,和奶油奶酪糊混合均匀。

5.酱覆盆子果酱涂抹在塔里,然后将奶酪蛋糕糊倒入塔至8分满,放入冰箱30分钟至稍微凝固。倒入柠檬酱至10分满。

6.放入冰箱继续冷藏1小时,装饰,享用


柠檬酱材料(做4个)

A)

1  全蛋

25g 柠檬汁

30g 细砂糖

1 /2小匙粟米粉

适量 柠檬皮屑


(B) 

23g --- 牛油


C

40g鲜奶油(Thickened Cream

30g糖粉


柠檬酱做法:

1.  将(A)的材料放进一个小锅子里,小火,边煮边搅拌,至浓稠。

2.  加入牛油搅拌至柠檬酱顺滑。

3. 把柠檬酱倒入干净的容器里,盖上一张保鲜膜,待冷备用。

4.把奶油和糖粉一起打发至7

4.   柠檬酱冷切后,用打蛋器打至顺滑,加入打发的鲜奶油混合均匀。


绿茶芝士蛋糕(做四个)

65g奶油奶酪

80g鲜奶油 thickened cream

20g糖粉

10g白巧克力

3g抹茶粉


做法:

1.奶油奶酪,白巧克力,糖粉放在容器里隔水融化搅拌成无颗粒

2.打发鲜奶油至6分发,加入奶油奶酪糊里搅拌均匀。

3. 把覆盆子果酱涂抹在塔里,倒入塔里至8分满,放入冰箱冷却至凝固。


抹茶甘纳许

70g白巧克力

47g 鲜奶油(pure cream

3g 抹茶粉


做法:

1.把白巧克力放小锅里煮至开始滚就可以熄火。

2.倒入白巧克力静置一分钟后,加入抹茶粉,拌匀至顺滑。

3.倒入事先做好的抹茶芝士塔至10分满.

4.再放入冰箱至到甘纳许凝结,装饰,享用。


Wednesday, 28 October 2020

桑葚蓝莓派( Mulberry & Blueberry Pie)


正是桑葚 季节,Wing 的家婆送了好多新鲜的桑葚和一瓶自己亲手做的桑葚果汁给我。我还是第一次吃到这个水果,果汁酸酸甜甜的很好喝,有点像和利宾纳的感觉。谷歌了一下到底Mulberry中文叫什么,原来叫桑葚,也益处良多。真幸运赠予我益处满满的水果,感恩🙏


Pie crust:

450g plain all purpose flour

1 tablespoon caster or superfine sugar

1 teaspoon fine salt

170g butter, cold, cubed

2 tablespoons lard

1tbs vinegar 

some ice cold water 


Mulberry Pie filling:

3.5cups mulberries

1 cup blueberry 

60g sugar

2tbsp lemon juice

1 tablespoons cornflour mixed with cold water


Others:

egg wash (egg yolk mixed with 1 teaspoon water)

3 tablespoons raw sugar 

Vanilla ice cream to serve


Make the pastry

1 ) Place the flour, sugar and salt in a food processor and pulse to combine. Then add the butter and lard and process. Then add cold water by the tablespoon and pulse until it just comes together. Divide the dough into two rounds (one 2/3 and the other 1/3 of the dough) and wrap in cling film and allow to rest in the fridge for 2 hours or overnight.


Make the filling  

1 )Add the mulberries and sugar to a saucepan and cook on medium to high heat for 5-6 minutes. If it is too liquidy pour the juice in another container ( juice can make some syrup) 


2 ) Reduce the heat to low add lemon juice then stir in cornflour  mixture to thicken up the filling. Set aside to cool. 


Make the pie:

1 ) Preheat oven to 200C. Roll out one of the rounds to fit a large pie tin. Dock the pastry with a fork, cover and then place in the fridge for 30 minutes. Line with parchment and baking beads and bake for 15 minutes. Remove the parchment and bake for another 5 minutes or until cooked. Cool.


2 )While it baking roll out the other round of pastry and cut into thin strips and place in fridge until needed .


3 )Place the cooled filling into the pie base and then line up half of the strips facing one way. The way to make a lattice pattern is to interweave the pastry-lift up every second strip of vertical pastry and add a horizontal row and then lift up alternating strips. Press a fork to the sides and then cut off excess pastry. 


4 )Brush with egg wash and sprinkle with raw sugar and then bake for 25 minutes or until the pastry is golden. Serve with vanilla ice cream.


Thursday, 23 July 2020

年轮蛋糕(Baumkuchen)蓝莓柠檬酱塔 (Blueberry & Lemon Curd Tarts)


年轮蛋糕

材料:25cm x 25cm模具)
⚠️⚠️:需要做两个蛋糕(以下材料需要准备两份)

3粒蛋黄
30g玉米油
30g牛奶
30g低筋面粉
少许香草精

3粒蛋白柠檬汁几滴、
30g细砂糖

做法:
1)将鸡蛋分离在两个无水无油的干净碗里
2)蛋黄,牛奶,植物油,混合拌匀。筛入蛋糕粉,搅拌均匀至无颗粒。
3)蛋清分三次加入糖,打发到湿性发泡。
4)把蛋白霜分次加入蛋黄面糊里用刮刀轻轻搅拌均匀。
5)再倒入铺了蛋糕纸的烤盘里,然后轻轻把空气敲出。
6)烤箱预热170度,(中层)烘烤大约20分钟。
7 蛋糕烘好后,立刻把蛋糕取把蛋糕纸撕掉。
8)烘烤后,取出蛋糕放在网架上,把纸撕掉四周撕开散热。放置一旁等稍微冷却把蛋糕纸整个撕掉。
9 蛋糕完全冷却后,把蛋糕切5cm宽长条,涂上草莓果酱,洒上一些切丁草莓粒,然后涂上一层芝士慕斯酱。开始绕圈把蛋糕卷好。
9)当第一条卷完,轻放在第二条蛋糕体再卷起来,重复动作
10)最后留一些蛋糕不要涂酱,冷冻备用,做装饰用。
11)卷完后,用塑胶片圈起黏好,放入冰箱冷藏一小时定型。
12)把刚才冷冻的戚风蛋糕放在食物搅拌机磨碎
7)蛋糕外層塗抹一層慕斯,輕輕黏上蛋糕碎。 装饰好冷冻半小时后享用。

夹心(1):
草莓酱 (我用市售)
一些新鲜草莓切小丁

夹心(2)芝士慕斯:
30g砂糖
25g
1粒蛋黃 
4g魚膠粉 
60g馬斯卡彭芝士 
300g鮮奶油(Thickened Cream

芝士慕斯
1)将鱼胶粉用一大匙水泡软。
混合砂糖,水及蛋黃,一邊用熱水座熱一邊攪拌至濃稠狀60 °C 
2)離火後加入已泡軟的魚膠粉及馬斯卡彭芝士攪拌均勻 
3)鲜奶油和糖粉打发至8成後與先前的蛋漿混合。
4)剩下(50g)作之後塗抹用


藍莓檸檬醬塔

派皮材料:
140g 无盐奶油(室温软化)
70g 糖粉
40g  
40g 杏仁粉 
260g 低粉 
少许 
1 tsp 香精

做法
1)将奶油,糖粉,盐及香精用打蛋机混合拌均,加入蛋,拌打均匀。
2)把杏仁粉加入,混合均匀,最后拌入低粉,搅拌成顺滑的面团。
3)盖上保鲜纸,放入冰箱冷冻至少三小时以上。
4)把面团取出,杆成约5mm薄度,轻轻按入挞模里,把多余的面团除掉,用叉子在底部刺小洞。
5)将挞模放入冰箱冷藏10分钟,取出,放入预热烤炉,以170度烤约15分钟或呈淡淡的金黄色。

柠檬酱材料
A)
2  全蛋
50g 柠檬汁
60g 细砂糖
小匙粟米粉
适量 柠檬皮屑

(B) 
45g --- 牛油

C
打发鲜奶油Thickened Cream
(我用40g 鲜奶油和30g糖粉打发 

柠檬酱做法:
1.  将(A)的材料放进一个小锅子里,小火,边煮边搅拌,至浓稠。
2.  加入牛油搅拌至柠檬酱顺滑。
3. 把柠檬酱倒入干净的容器里,盖上一张保鲜膜,待冷备用。
4.   冷切后,加入打发的鲜奶油混合均匀。

做蓝莓塔:
新鲜蓝莓
少许桃子酱
金箔(装饰)

1)把桃子酱放入微波炉里叮10-15 秒,至融化成液状,放入蓝莓。让每粒蓝莓都裹上果酱。
2)把柠檬酱装入裱花袋,挤进塔里。
3)把蓝莓摆在柠檬酱上,少许金箔装饰。


Monday, 11 May 2020

Cheese Tarts (流心芝士塔)


Sweet Shortcrust Pastry
Ingredients:
70g unsalted butter, at room temperature
35g icing sugar
a pinch of salt
1 tsp vanilla extract
20g egg
150g pastry flour, sifted

To make the pastry:
1Prepare sweet short pastry. Beat butter, icing sugar , salt and vanilla extract with an electric mixer until just combine. Add eggs and beat well. Add flour and fold through completely. Mix batter until a smooth dough and wrap dough in cling film. Place in the refrigerator to rest for at least 3 hours.

2Preheat oven to 170C

3Unwrap dough and place on a non stick baking mat. Roll our the dough to thickness 3-5 mm.

4) Gently press dough into tartlet tins. Chill in the fridge for 30minutes then poke holes at the base of the tart cases bake for 12 minutes until tartlets become light brown. Set aside to cool.


Cheese custard (make 7 tarts)
Ingredients:
  • 80g cream cheese
  • 20g cheddar cheese
  • 1 tbsp parmesan cheese
  • 15g salted butter
  • 50g fresh milk
  • 20g icing sugar
  • 6g corn starch
  • 1 /2 egg
  • 1 tsp lemon juice
  • 1/4 tsp vanilla extract
  • 1 egg yolk for brushing on top of custard

1Add cream cheese, cheddar cheese, parmesan cheese, fresh milk and salted butter into a small pot. Bain marie method, to create a gentle and uniform heat for cooking custard. Keep stirring the mixture till everything is melted.

2Once the mixture has melted, add sifted corn starch and icing sugar. Mix till well-blended, the mixture will thicken slowly.

3Add egg, vanilla extract and lemon juice. Mix till well-blended, the mixture will further thicken into custard.

4Let the custard cool down completely. ( faster to cool down in the fridge )

6Fill the cheese custard into a piping bag. Pipe the custard into the tart cases. Brush custard evenly with egg yolk.

7Grill the tarts at preheated 230C for 6-7 mins.

8Once baked, remove from oven and place on wire rack to cool. Best eaten warm, freshly baked.


Tuesday, 28 January 2014

Pineapple Tarts (黄梨饼)


今早刻意早点起身,把最后一项年饼烘完,可以收工过年了。昨晚给Eileen打电话时,跟她讲我今天要做黄梨糕,问她做这个剪剪的pattern会难吗?她告诉我一个要剪十一刀,有一点多工。我就告诉她,让我考虑一晚,如果心情好就剪,心情不好就印花好了。果然今天心情大好,一早爬起来就开始这个剪剪的工程。一粒粒“旺来花”很快的就出炉了。在我很开心的拍着照片时,我家老公回来了,他竟然问我“你做strawberry”饼啊?。。。气!!

谢谢大家的激励推荐Sonia自创的好食谱,这个黄梨糕真的很好吃。面团也容易操作。我没有上蛋液,省了很多功夫呐!

在这里祝大家新年快乐,万事如意!


来自:Sonia
材料
350g - 牛油
100g - 字罐装
510g - 面粉
2 - 蛋黄
黄梨馅 (我用市售黄梨馅)

做法
1. 把牛油和乳打
2. 蛋一粒接一粒加入,充分拌均匀。
3. 入面粉,拌成一个不粘手的面(如果要做个造型,保留一些面,染上青色)
4. 把面分成小份,裹入黄梨馅,揉成椭圆形。用一把剪刀,剪出刺猬纹形状。
把青色面团压平,用菊花型的模子压出像叶子的形状。贴在顶部,用一只丁香插在叶子上做杆
5. 预热烤箱170C,烤15-18
6. 放凉后才收入罐里。


Ingredients :
350g butter
100g condensed
510g plain flour / all purpose flour
2 egg yolks

700g Pineapple filling (I used store-bought)


Method:
1. Cream butter and condensed milk till light.
2. Add in egg yolk one at a time, and beat until combine.
3. Mix in flour, mix till become a soft and not sticky dough. (Reserve small portion of the dough to tint with green colour to make some leaves for this pineapple tart pattern)
4. Divide dough into ~15g each, wrap with pineapple jam filling.

5.Roll into oval shape and use a small  (sharp end) scissors to snip the surface to form a spiky look.
Roll out green dough, use a daisy flower cutter to cut the leaves. Place the a leaf  and  follow by inserting a clove on the top.

6. Bake in preheated oven at 170c for 15-18mins or till golden brown.
7. Cool on wire racks before storing.